Spring/Spring Framework

[Netty] Netty가 뭐에요? - 4탄 : Spring MVC 와 Spring Web Flux 그리고 Netty 예시 코드 탐방

공대키메라 2025. 10. 7. 17:07


지난 시간에는 Netty의 공식문서에 있는 특징에 대해 알아보고 NIO 에 대한 예시 코드를 작성해보았다.

(지난글은 여기 클릭!)


이번 시간에는 자바공화국 한국에서 가장 많이 사용하는 Spring framework 와 Netty Framework을 간단하게 비교해보고


Netty 공식문서에서 제공하고 있는 예시 코드를 탐방해볼 것이다.


개인적으로 특정 기술에 대해 잘 모르겟으면, 필자 키메라는 비교군을 찾는 것이 좋다고 생각한다.


기존의 Spring은 뭐가 부족했길레 Netty 가 필요했던 것이고 두 개의 성격을 비교해보고자 한다.


물론 이전의 글 중 하나인 [Netty] Netty가 뭐에요? - 2탄 : Netty가 필요하기 까지 를 보면 짐작할 수 있겠지만,


이에 대한 근거를 좀 더 확인해보고 가려고 한다.


그리고 더 나아가서는 Netty사용시 문제되는 동시성 문제에 대해 어떻게 해결을 해야 할 지 고민을 해보려고 한다.


바로 그럼 가보도록 하자. 바로 고!


바로 고! 올ㅋ


1. Spring MVC

왜 뜬금없이 Spring MVC에 대해 다시 보냐고?


우리는 2탄 글에서 Servlet에 대해서 알아보았다. (이전글 - [Netty] Netty가 뭐에요? - 2탄 : Netty가 필요하기 까지 )


Spring 에도 MVC 패턴에서 확인할 수 있는 Servlet 구현체가 있는데, Dispatcher Servlet이다.


사실 Spring MVC에 대한 소개를 공식문서에서 할 때 Servlet 기반으로 만들어졌다는 글이 똭! 그대로 적혀있다.


Spring Web MVC is the original web framework built on the Servlet API and has been included in the Spring Framework from the very beginning.

The formal name, "Spring Web MVC," comes from the name of its source module (spring-webmvc), but it is more commonly known as "Spring MVC".


Spring Web MVC 는 Servlet API 위에 구축된 원조 웹 프레임워크로, 스프링 프레임워크 초창기부터 포함되어 왔다.

공식 명칭인 “Spring Web MVC”는 소스 모듈 이름(spring-webmvc)에서 유래했지만, 일반적으로는 “Spring MVC”로 더 잘 알려져 있다.


Servlet이 뭐였는지 지난 글을 다시 보자면


서블릿은 요청-응답 프로그래밍 모델(request-response programming model) 을 통해 접근되는 애플리케이션을 호스팅하는 서버의 기능을 확장하기 위해 사용되는 Java 프로그래밍 언어 클래스이다.


그리고 Serlvet는 그냥 규격이고 직접 구현은 안되었다는 단점이 존재했다.


이를 Spring 에서는 Spring MVC, 혹은 Spring Web MVC로 하나의 프레임워크로 제공하는 것이다.


해당 그림은 김영한 선생님의 Spring MVC에서 설명하는 구조이다.


정말 얼마나 많은 사람들이 해당 강의를 들엇으면, 그리고 코로나 시기에 엄청난 붐과 함께 해당 그림은 말 그대로 인터넷에서 쉽게 찾아볼 수 있는 좋은 학습 소스가 되었다.


작동 순서를 정리하면 다음과 같다.


Spring MVC 전체 동작 순서
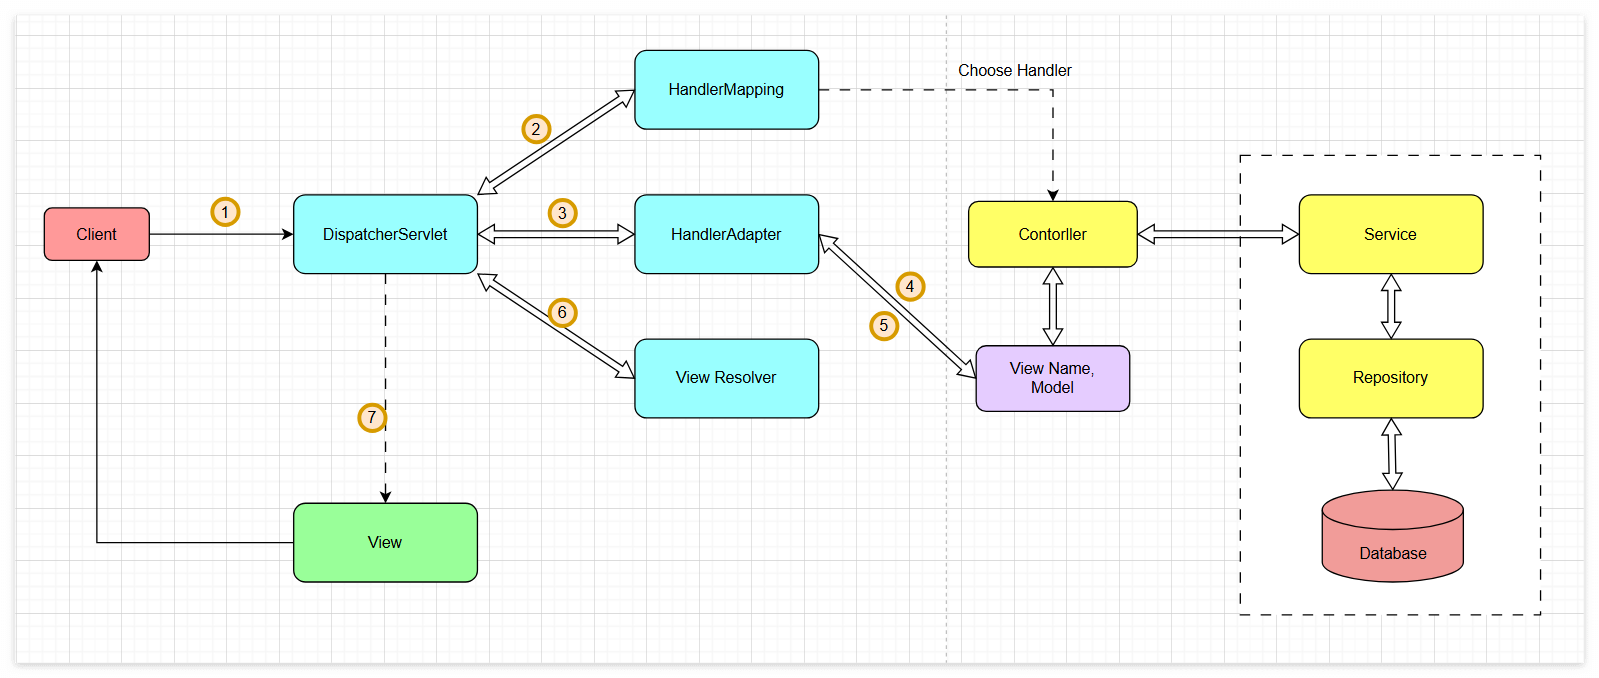
0. HTTP 요청 수신

  • 클라이언트의 요청이 DispatcherServlet으로 전달

1. 핸들러 조회

  • HandlerMapping을 통해 요청 URL에 매핑된 핸들러(컨트롤러)를 조회

2. 핸들러 어댑터 조회

  • 조회된 핸들러를 실행할 수 있는 HandlerAdapter를 조회

3. 핸들러 어댑터 실행

  • HandlerAdapter를 통해 실제 핸들러 호출

4. 핸들러 실행

  • HandlerAdapter가 실제 핸들러(컨트롤러)를 실행
  • 비즈니스 로직 처리 및 결과 반환

5. ModelAndView 반환

  • HandlerAdapter가 핸들러의 반환값을 ModelAndView로 변환하여 DispatcherServlet에 반환

6. ViewResolver 호출

  • 뷰 이름을 기반으로 ViewResolver를 호출

7. View 반환

  • ViewResolver가 논리 이름을 물리 이름(실제 JSP 경로 등)으로 변환
  • 렌더링을 담당하는 View 객체 반환

8. 뷰 렌더링

  • View 객체를 통해 Model 데이터를 사용하여 최종 HTML 생성

9. HTTP 응답

  • 렌더링된 결과를 클라이언트에게 응답


뭐.. 그렇단다.

2. Spring Web Flux

The original web framework included in the Spring Framework, Spring Web MVC, was purpose-built for the Servlet API and Servlet containers.

The reactive-stack web framework, Spring WebFlux, was added later in version 5.0.

It is fully non-blocking, supports Reactive Streams back pressure, and runs on such servers as Netty, Undertow, and Servlet containers.


Spring Framework, Spring Web MVC에 포함된 기존 web framewoek는 Servlet API 와 Servlet Container에 목적을 두고 만들어졌다.

reactive-stack 웹 프레임워크인 Spring Web Flux는 spring 버전 5.0 이후에 추가되었다.

완전히 non-blocking이고 Reactive Streams 백프레셔를 지원하며 Netty, Undertow 그리고 Servlet container같은 서버에서 작동한다.


spring web flux는 2017년 이후로 공개가 되었다고 한다.


이전에는 비동기 프로그래밍은 직접 해야 하거나 Netty를 사용해야 한 것 같다.


여기서 reactive-stack, reactive streams, back pressure 그리고 Undertow 가 뭐고, Netty도 지원한다는게 무슨 말인지


또한 Servlet container같은 서버에서도 작동한다는게 무슨 말인지 이해가 안됐다.


Reactive streams?

Reactive Streams is a small spec (also adopted in Java 9) that defines the interaction between asynchronous components with back pressure.

For example a data repository (acting as Publisher) can produce data that an HTTP server (acting as 
Subscriber) can then write to the response.

The main purpose of Reactive Streams is to let the subscriber control how quickly or how slowly the publisher produces data.

Reactive Streams는 백프레셔(back pressure)를 지원하는 비동기 컴포넌트 간의 상호작용을 정의하는 작은 스펙입니다(Java 9에서도 채택됨).

예를 들어, 데이터 저장소(Publisher 역할)가 데이터를 생성하면 HTTP 서버(Subscriber 역할)가 그 데이터를 응답에 작성할 수 있습니다.

Reactive Streams의 주요 목적은 구독자(Subscriber)가 발행자(Publisher)의 데이터 생성 속도를 얼마나 빠르게 또는 느리게 할지 제어할 수 있게 하는 것입니다.


Reactive Stream을 찾아보면 글이 많으니 그건 알아서 찾아보자.


Back Pressure

Back Pressure는 유체역학(Fluid Dynamics)에서는 유동유체의 흐름이 방해를 받아 유체의 흐름방향과 반대방향으로 유체에 가해지는 압력으로,


기본적으로 일정한 유량이 흐르지만 파이프의 크기가 작아지면 속도가 빨라진다. (베르누이 방정식)


에너지 보존 법칙에 따르면 속도는 빨라지지만 압력은 낮아질 것이다. 유량의 에너지는 마찰력이 0이라는 가정 하게 동일하게 유지되기 때문이다. (갑분 유체역학 시간...)


그런데 여기서 파이프가 막혀버린 것이다. 그러면 압력이 증가한다. 뒤로 나오는 역압력(back pressure)이 증가한다.


이를 IT분야에서 차용한다면 백프레셔는 이미 받은 요청 내에서 데이터 흐름이 막혔을 때 발생한다.


데이터 흐름을 눌러서 천천히 들어오게 하는 것이다.


즉, Spring Web Flux 에서 말하는 백프레셔 지원은 우리가 서버 → 데이터 소스 간의 흐름 제어를 할 수 있도록 도와준다는 말이다.


Spring Web Flux - Server 섹션


Spring WebFlux is supported on Tomcat, Jetty, Servlet containers, as well as on non-Servlet runtimes such as Netty and Undertow.

All servers are adapted to a low-level, common API so that higher-level programming models can be supported across servers.

Spring WebFlux does not have built-in support to start or stop a server. However, it is easy to assemble an application from Spring configuration and WebFlux infrastructure and run it with a few lines of code.

Spring Boot has a WebFlux starter that automates these steps. By default, the starter uses Netty, but it is easy to switch to Tomcat, Jetty, or Undertow by changing your Maven or Gradle dependencies.

Spring Boot defaults to Netty, because it is more widely used in the asynchronous, non-blocking space and lets a client and a server share resources.


Spring WebFlux는 Tomcat, Jetty, Servlet 컨테이너뿐만 아니라 Netty와 Undertow 같은 non-Servlet 런타임에서도 지원됩니다. 모든 서버는 low-level의 공통 API로 어댑터화되어 있어서, 상위 수준의 프로그래밍 모델이 서버 전반에 걸쳐 지원될 수 있습니다.

Spring WebFlux는 서버를 시작하거나 중지하는 built-in 지원을 가지고 있지 않습니다. 하지만 Spring 설정과 WebFlux 인프라로부터 애플리케이션을 조립하고 몇 줄의 코드로 실행하는 것은 쉽습니다.

Spring Boot는 이러한 단계들을 자동화하는 WebFlux starter를 가지고 있습니다. 기본적으로 starter는 Netty를 사용하지만, Maven이나 Gradle 의존성을 변경함으로써 Tomcat, Jetty 또는 Undertow로 쉽게 전환할 수 있습니다.

Spring Boot는 Netty를 기본값으로 사용하는데, 이는 비동기, non-blocking 영역에서 더 널리 사용되며 클라이언트와 서버가 리소스를 공유할 수 있게 해주기 때문입니다.


해당 글을 잘 보면 Netty를 기본값으로 사용한다고 한다. 그러니까 netty를 기본적으로 application 서버로 사용한다는 말이다.


결국 Spring Web Flux는 Reactive Streams를 기존에 잘 사용하도록 도와주는 framework로 따로 기존에 있던 서버를 호환해서 사용할 수 있도록 지원해주는 비동기 프레임워크이다.


기본적으로 Netty서버를 기반으로 하기에 Netty를 잘 이해하면 결국 추후에 Spring Web Flux같은 프레임워크도 이해하는게 어렵지 않을 거라는 판단이다.


그런데 이해가 안되는 부분이 있는데,


Netty는 공식문서에서 framework라고 소개했는데, Spring Web Flux에서는 서버로 사용한다니 이게 무슨 말인가?

Netty에 대한 소개를 공식문서에서 다시 봐야겠다.


netty.io 공식문서


Netty is an asynchronous event-driven network application framework for rapid development of maintainable high performance protocol servers & clients.


Netty는 빠른 유지가능한 고성능 프로토콜 서버 클라이언트 개발을 위한 비동기 이벤트기반 네트워크 어플리케이션 프레임워크다. 


아니 도대체 어디있어? 했지만... 나는 굉장히 많이 봐왔었다. 다만 이걸 내가 부족해서 이해를 못했을 뿐 ㅠㅠ...


서버 클라이언트 개발을 위한 비동기 이벤트기반 네트워크 어플리케이션 프레임워크


라고 대놓고 공식문서 맨 앞에 대문짝만하게 명시가 되어 있다.


와하... 이걸 놓쳐서 spring webflux 에서 서버로 사용한다고 했을 때 이해를 못했구나~


이전에 NIO 예시 코드를 물어봐서 작성을 해봤을 때 NIO에서 client 역할도 하고, server역할도 하긴 했다.


아하! 그래서 이전에 NIO 예시 코드로 그래서 파일이 여러개였구나...


client과 server역할을 하는 코드를 따로 분리해서 client에서 server에 호출하는 구조였다.


이에 대해서 이해를 하니 gpt코드가 더 잘 이해되는거 같기도 하고... 아님 말고! 데헷 ㅎ

(이전 코드가 여기 클릭 - [Netty] Netty가 뭐에요? - 3탄 : Netty의 특징과 구조 및 NIO 테스트)


결론적으로 Netty가 서버 클라이언트 개발을 위한 비동기 이벤트기반 네트워크 어플리케이션 프레임워크라면


Spring WebFlux는 Reactive Streams 기반으로 웹 애플리케이션 개발을 편하게 해주는 비동기 웹 프레임워크로 다양한 서버를 지원한다.


Spring Webflux위에 포함된 것이 아닌 지원해주는 것으로 Netty를 실행할 수 있는 구조이다.


휴... 이해하기 참 힘드네 정말 ㅋㅋ


Spring Webflux 에 대한 공식문서를 보면 더 많은 내용이 있지만, 이번에는 이정도로만 보겠다.


3. Netty 예시 찾아보기 - DiscardServer와 내부 class 파악

그려면 드디어... 실제 예시 코드를 찾아 보려고 한다.


user guide를 공식 사이트에서 예시들을 다양하게 제공하고 있다.


필자는 4.x 버전의 가이드를 보려고 한다. (회사에서 그걸 봄)


첫 번째 예시로 writing a Discard Server를 소개한다.


DiscardServerHandler.java

import io.netty.buffer.ByteBuf;

import io.netty.channel.ChannelHandlerContext;
import io.netty.channel.ChannelInboundHandlerAdapter;

/**
 * Handles a server-side channel.
 */
public class DiscardServerHandler extends ChannelInboundHandlerAdapter { // (1)

    @Override
    public void channelRead(ChannelHandlerContext ctx, Object msg) { // (2)
        // Discard the received data silently.
        ((ByteBuf) msg).release(); // (3)
    }

    @Override
    public void exceptionCaught(ChannelHandlerContext ctx, Throwable cause) { // (4)
        // Close the connection when an exception is raised.
        cause.printStackTrace();
        ctx.close();
    }
}


여기서 알아볼것들은 다음과 같다.


  • Channel
  • ChannelHandler
  • ChannelHandlerContext
  • ChannelHandlerAdapter
  • ChannelInounbHandler
  • ChannelInounbHandlerAdapter

ChannelHandler 즉, 채널 관리자가 많이 나오는데, Channel도 실제로 까봐야 겠더라 싶었다.


Channel

A nexus to a network socket or a component which is capable of I/O operations such as read, write, connect, and bind.

A channel provides a user: the current state of the channel
(e.g. is it open? is it connected?),the configuration parameters of the channel
(e.g. receive buffer size),the I/O operations that the channel supports
(e.g. read, write, connect, and bind),
and the ChannelPipeline which handles all I/O events and requests associated with the channel.

네트워크 소켓 또는 read, write, connect, bind와 같은 I/O 작업이 가능한 컴포넌트로의 연결점.

Channel은 사용자에게 다음을 제공한다:
채널의 현재 상태(예: 열려있는가? 연결되어 있는가?),
채널의 설정 매개변수(예: 수신 버퍼 크기),
채널이 지원하는 I/O 작업(예: read, write, connect, bind),
그리고 채널과 관련된 모든 I/O 이벤트와 요청을 처리하는 ChannelPipeline.


뭐...? 넥서스...?

ㅗㅜㅑ 아재...


Channel은 단순한 채널, 즉 연결점이 아니라 내부적으로 여러 일을 해주는것 같다.


Channel Handler

Handles or intercepts a ChannelInboundInvoker or ChannelOutboundInvoker operation, and forwards it to the next handler in a ChannelPipeline.

ChannelInboundInvoker와 ChannelOutboundInvoker 작업을 다루거나 intercept하고 ChannelPipeline에서 다음 handler로 넘긴다.


인바운드와 아웃바운드는 트래픽에 네트워크 간에 이동하는 방향을 말하는데,


인바운드라고 하면 네트워크 안으로 들어오는 것이고, 아웃바운드는 네트워크에서 나가는 것이다.


ChannelHandler는 ChannelHandlerContext 객체에서 제공받는다.


ChannelHandler는 컨텍스트 객체를 통해 자신이 속한 ChannelPipeline과 상호작용하도록 되어 있다.


컨텍스트 객체를 사용하여, ChannelHandler는 이벤트를 상위(upstream) 또는 하위(downstream)로 전달하거나, 파이프라인을 동적으로 수정하거나, 핸들러에 특화된 정보를 저장(AttributeKey 사용)할 수 있다.


ChannelHandlerContext

Enables a ChannelHandler to interact with its ChannelPipeline and other handlers. A handler can notify the next ChannelHandler in the ChannelPipeline, modify the ChannelPipeline it belongs to dynamically.

ChannelHandler가 ChannelPipeline과 다른 handler들과 상호작용 할 수 있게 한다. 

Handler는 다음 ChannelHandler와 ChannelPipeline으로 알리거나 동적으로 속하는 ChannelPipeline을 수정할 수 있다.


ChannelHandlerAdapter

Skeleton implementation of a ChannelHandler.


ChannelHandler를 위한 스켈레톤 구현체.


해골 구현체...? 뒤에 다시 알아보자.


ChannelInboundHandler

ChannelHandler which adds callbacks for state changes. This allows the user to hook in to state changes easily.


ChannelHandler는 상태 변경에 대한 콜백을 추가하는 핸들러입니다.
이를 통해 사용자는 상태 변경에 쉽게 hook을 걸 수 있습니다.


Hook? 이거는 왜 여기서 나오는 것인가... Hook이라는게 Java에도 있던건지 나는 잘 몰랐다.


react 에 대해서 공부를 좀 했었는데, 이에 대해서 좀 알아봐야겠다.


ChannelInboundHandlerAdapter

Abstract base class for ChannelInboundHandler implementations which provide implementations of all of their methods.

This implementation just forward the operation to the next ChannelHandler in the ChannelPipeline.

Sub-classes may override a method implementation to change this.


ChannelInboundHandler 구현체들을 위한 추상 베이스 클래스로, 모든 메서드의 구현을 제공합니다.

이 구현은 단순히 작업을 ChannelPipeline의 다음 ChannelHandler로 전달합니다.

서브클래스는 이를 변경하기 위해 메서드 구현을 오버라이드할 수 있습니다.


여기서 쭉 나온 의문점을 정리해보면


ChannelPipeline, Hook, 해골 구현체? 그리고 구조에 대한 이해가 잘 되지 않았다.


위 4가지에 대해서 좀 알아보도록 하겠다.


4. ChannelPipeline and structure, Hook, Skeleton implementation

필자가 ChannelPipeline에 대한 글을 찾던 중, 아주 잘 정리한 Medium의 글을 알게 되었다. (여기 클릭)


사실 공식 문서에서는 설명을 하고 예시를 주고 땡(?)이다. 


나름 잘 정리되어 있기는 하지만, 이를 더 잘 정리한 고수님들의 글을 참고하면 좋을 듯하다.


Netty의 데이터 모델 과 Channel 그리고 ChannelPipeline

Data model

Netty’s data model is fairly straightforward: the core type is a Channel, which has its own ChannelPipeline and is associated with a single EventLoop from an EventLoopGroup.


데이터 모델

netty의 데이터모델은 꽤 직설적이다. 핵심 타입은 Channel인데, ChannelPipeline을 가지고 있고 EventLoopGroup에서 하나의 EventLoop와 연관되어 있다.


각 채널들은 자신만의 채널 파이프라인을 가지고 있고, 이는 Handler들을 넘기는 구조이다.


이에 대한 설명은 Channel에 이미 있긴 하다. 


위에 스크롤을 올려서  Channel에 대한 공식문서 설명을 정리하면 데이터 모델 설명이 되는 것이다.


다만 이를 좀 더 정리된 설명과 그림으로 알려주니 좋은것이다.


출처 : https://medium.com/@akhaku/netty-data-model-threading-and-gotchas-cab820e4815a


Interface ChannelPipeline

A list of ChannelHandlers which handles or intercepts inbound events and outbound operations of a Channel. 

ChannelPipeline implements an advanced form of the Intercepting Filter pattern to give a user full control over how an event is handled and how the ChannelHandlers in a pipeline interact with each other.


인터페이스 ChannelPipelines

한 채널의 inbound 이벤트들과 outbound 작업들을 다루거나 가로채는(intercept) ChannelHandler의 리스트.

ChannelPipeline은 Intercepting Filter 패턴의 고급 형태를 구현하여, 사용자에게 이벤트가 어떻게 처리되는지
그리고 파이프라인 내의 ChannelHandler들이 서로 어떻게 상호작용하는지에 대한 완전한 제어권을 제공한다;


채널 안에 채널 파이프라인이 있고, 이것을 EventLoopGroup 내부의 EventLoop가 바라보는 형식이다.


여기서 ChannelPipeline은 Intercepting Filter 패턴의 고급 형태를 구현한다는데,


단순한 filter에서 뭔가 ... 기능이 더 추가된걸로 이해된다.


출처 : https://medium.com/@akhaku/netty-data-model-threading-and-gotchas-cab820e4815a


Hook

상태변경 시점에 낚아채서 별도의 작업을 할 수 있도록 하는 기능이다. 

Handler이것들이 Hook, 즉 무언가 상태가 변경되는 시점인가보다.


그러면 뭐의 상태가 변할 때 Hook이 걸린다는건지... 하고 찾아보니 Channel이 그렇다.


너무 긴 관계로... 궁금하면 다음을 클릭해서 보면 된다. 

더보기

Channel.java

/*
 * Copyright 2012 The Netty Project
 *
 * The Netty Project licenses this file to you under the Apache License,
 * version 2.0 (the "License"); you may not use this file except in compliance
 * with the License. You may obtain a copy of the License at:
 *
 *   https://www.apache.org/licenses/LICENSE-2.0
 *
 * Unless required by applicable law or agreed to in writing, software
 * distributed under the License is distributed on an "AS IS" BASIS, WITHOUT
 * WARRANTIES OR CONDITIONS OF ANY KIND, either express or implied. See the
 * License for the specific language governing permissions and limitations
 * under the License.
 */
package io.netty.channel;

import io.netty.buffer.ByteBuf;
import io.netty.buffer.ByteBufAllocator;
import io.netty.channel.socket.DatagramChannel;
import io.netty.channel.socket.DatagramPacket;
import io.netty.channel.socket.ServerSocketChannel;
import io.netty.channel.socket.SocketChannel;
import io.netty.util.AttributeMap;

import java.net.InetSocketAddress;
import java.net.SocketAddress;


/**
 * A nexus to a network socket or a component which is capable of I/O
 * operations such as read, write, connect, and bind.
 * <p>
 * A channel provides a user:
 * <ul>
 * <li>the current state of the channel (e.g. is it open? is it connected?),</li>
 * <li>the {@linkplain ChannelConfig configuration parameters} of the channel (e.g. receive buffer size),</li>
 * <li>the I/O operations that the channel supports (e.g. read, write, connect, and bind), and</li>
 * <li>the {@link ChannelPipeline} which handles all I/O events and requests
 *     associated with the channel.</li>
 * </ul>
 *
 * <h3>All I/O operations are asynchronous.</h3>
 * <p>
 * All I/O operations in Netty are asynchronous.  It means any I/O calls will
 * return immediately with no guarantee that the requested I/O operation has
 * been completed at the end of the call.  Instead, you will be returned with
 * a {@link ChannelFuture} instance which will notify you when the requested I/O
 * operation has succeeded, failed, or canceled.
 *
 * <h3>Channels are hierarchical</h3>
 * <p>
 * A {@link Channel} can have a {@linkplain #parent() parent} depending on
 * how it was created.  For instance, a {@link SocketChannel}, that was accepted
 * by {@link ServerSocketChannel}, will return the {@link ServerSocketChannel}
 * as its parent on {@link #parent()}.
 * <p>
 * The semantics of the hierarchical structure depends on the transport
 * implementation where the {@link Channel} belongs to.  For example, you could
 * write a new {@link Channel} implementation that creates the sub-channels that
 * share one socket connection, as BEEP</a> and
 * SSH</a> do.
 *
 * <h3>Downcast to access transport-specific operations</h3>
 * <p>
 * Some transports exposes additional operations that is specific to the
 * transport.  Down-cast the {@link Channel} to sub-type to invoke such
 * operations.  For example, with the old I/O datagram transport, multicast
 * join / leave operations are provided by {@link DatagramChannel}.
 *
 * <h3>Release resources</h3>
 * <p>
 * It is important to call {@link #close()} or {@link #close(ChannelPromise)} to release all
 * resources once you are done with the {@link Channel}. This ensures all resources are
 * released in a proper way, i.e. filehandles.
 */
public interface Channel extends AttributeMap, ChannelOutboundInvoker, Comparable<Channel> {

    /**
     * Returns the globally unique identifier of this {@link Channel}.
     */
    ChannelId id();

    /**
     * Return the {@link EventLoop} this {@link Channel} was registered to.
     */
    EventLoop eventLoop();

    /**
     * Returns the parent of this channel.
     *
     * @return the parent channel.
     *         {@code null} if this channel does not have a parent channel.
     */
    Channel parent();

    /**
     * Returns the configuration of this channel.
     */
    ChannelConfig config();

    /**
     * Returns {@code true} if the {@link Channel} is open and may get active later
     */
    boolean isOpen();

    /**
     * Returns {@code true} if the {@link Channel} is registered with an {@link EventLoop}.
     */
    boolean isRegistered();

    /**
     * Return {@code true} if the {@link Channel} is active and so connected.
     */
    boolean isActive();

    /**
     * Return the {@link ChannelMetadata} of the {@link Channel} which describe the nature of the {@link Channel}.
     */
    ChannelMetadata metadata();

    /**
     * Returns the local address where this channel is bound to.  The returned
     * {@link SocketAddress} is supposed to be down-cast into more concrete
     * type such as {@link InetSocketAddress} to retrieve the detailed
     * information.
     *
     * @return the local address of this channel.
     *         {@code null} if this channel is not bound.
     */
    SocketAddress localAddress();

    /**
     * Returns the remote address where this channel is connected to.  The
     * returned {@link SocketAddress} is supposed to be down-cast into more
     * concrete type such as {@link InetSocketAddress} to retrieve the detailed
     * information.
     *
     * @return the remote address of this channel.
     *         {@code null} if this channel is not connected.
     *         If this channel is not connected but it can receive messages
     *         from arbitrary remote addresses (e.g. {@link DatagramChannel},
     *         use {@link DatagramPacket#recipient()} to determine
     *         the origination of the received message as this method will
     *         return {@code null}.
     */
    SocketAddress remoteAddress();

    /**
     * Returns the {@link ChannelFuture} which will be notified when this
     * channel is closed.  This method always returns the same future instance.
     */
    ChannelFuture closeFuture();

    /**
     * Returns {@code true} if and only if the I/O thread will perform the
     * requested write operation immediately.  Any write requests made when
     * this method returns {@code false} are queued until the I/O thread is
     * ready to process the queued write requests.
     *
     * {@link WriteBufferWaterMark} can be used to configure on which condition
     * the write buffer would cause this channel to change writability.
     */
    boolean isWritable();

    /**
     * Get how many bytes can be written until {@link #isWritable()} returns {@code false}.
     * This quantity will always be non-negative. If {@link #isWritable()} is {@code false} then 0.
     *
     * {@link WriteBufferWaterMark} can be used to define writability settings.
     */
    long bytesBeforeUnwritable();

    /**
     * Get how many bytes must be drained from underlying buffers until {@link #isWritable()} returns {@code true}.
     * This quantity will always be non-negative. If {@link #isWritable()} is {@code true} then 0.
     *
     * {@link WriteBufferWaterMark} can be used to define writability settings.
     */
    long bytesBeforeWritable();

    /**
     * Returns an <em>internal-use-only</em> object that provides unsafe operations.
     */
    Unsafe unsafe();

    /**
     * Return the assigned {@link ChannelPipeline}.
     */
    ChannelPipeline pipeline();

    /**
     * Return the assigned {@link ByteBufAllocator} which will be used to allocate {@link ByteBuf}s.
     */
    ByteBufAllocator alloc();

    @Override
    Channel read();

    @Override
    Channel flush();

    /**
     * <em>Unsafe</em> operations that should <em>never</em> be called from user-code. These methods
     * are only provided to implement the actual transport, and must be invoked from an I/O thread except for the
     * following methods:
     * <ul>
     *   <li>{@link #localAddress()}</li>
     *   <li>{@link #remoteAddress()}</li>
     *   <li>{@link #closeForcibly()}</li>
     *   <li>{@link #register(EventLoop, ChannelPromise)}</li>
     *   <li>{@link #deregister(ChannelPromise)}</li>
     *   <li>{@link #voidPromise()}</li>
     * </ul>
     */
    interface Unsafe {

        /**
         * Return the assigned {@link RecvByteBufAllocator.Handle} which will be used to allocate {@link ByteBuf}'s when
         * receiving data.
         */
        RecvByteBufAllocator.Handle recvBufAllocHandle();

        /**
         * Return the {@link SocketAddress} to which is bound local or
         * {@code null} if none.
         */
        SocketAddress localAddress();

        /**
         * Return the {@link SocketAddress} to which is bound remote or
         * {@code null} if none is bound yet.
         */
        SocketAddress remoteAddress();

        /**
         * Register the {@link Channel} of the {@link ChannelPromise} and notify
         * the {@link ChannelFuture} once the registration was complete.
         */
        void register(EventLoop eventLoop, ChannelPromise promise);

        /**
         * Bind the {@link SocketAddress} to the {@link Channel} of the {@link ChannelPromise} and notify
         * it once its done.
         */
        void bind(SocketAddress localAddress, ChannelPromise promise);

        /**
         * Connect the {@link Channel} of the given {@link ChannelFuture} with the given remote {@link SocketAddress}.
         * If a specific local {@link SocketAddress} should be used it need to be given as argument. Otherwise just
         * pass {@code null} to it.
         *
         * The {@link ChannelPromise} will get notified once the connect operation was complete.
         */
        void connect(SocketAddress remoteAddress, SocketAddress localAddress, ChannelPromise promise);

        /**
         * Disconnect the {@link Channel} of the {@link ChannelFuture} and notify the {@link ChannelPromise} once the
         * operation was complete.
         */
        void disconnect(ChannelPromise promise);

        /**
         * Close the {@link Channel} of the {@link ChannelPromise} and notify the {@link ChannelPromise} once the
         * operation was complete.
         */
        void close(ChannelPromise promise);

        /**
         * Closes the {@link Channel} immediately without firing any events.  Probably only useful
         * when registration attempt failed.
         */
        void closeForcibly();

        /**
         * Deregister the {@link Channel} of the {@link ChannelPromise} from {@link EventLoop} and notify the
         * {@link ChannelPromise} once the operation was complete.
         */
        void deregister(ChannelPromise promise);

        /**
         * Schedules a read operation that fills the inbound buffer of the first {@link ChannelInboundHandler} in the
         * {@link ChannelPipeline}.  If there's already a pending read operation, this method does nothing.
         */
        void beginRead();

        /**
         * Schedules a write operation.
         */
        void write(Object msg, ChannelPromise promise);

        /**
         * Flush out all write operations scheduled via {@link #write(Object, ChannelPromise)}.
         */
        void flush();

        /**
         * Return a special ChannelPromise which can be reused and passed to the operations in {@link Unsafe}.
         * It will never be notified of a success or error and so is only a placeholder for operations
         * that take a {@link ChannelPromise} as argument but for which you not want to get notified.
         */
        ChannelPromise voidPromise();

        /**
         * Returns the {@link ChannelOutboundBuffer} of the {@link Channel} where the pending write requests are stored.
         */
        ChannelOutboundBuffer outboundBuffer();
    }
}


하여간 다양한 상태가 있는데, 기존의 nio 에서 지원하는 channel의 상태는 isOpen, close 밖에 없지만 netty에서의 channel은 훨씬 많은 상태 제어를 제공한다.


Skeleton Implementation

덜덜덜~ 해골 무셔~


찾아보니 Effective Java에서 소개된 패턴이라고한다.


[이펙티브 자바] 아이템 20 - 추상 클래스보다는 인터페이스를 우선하라 인데...


인터페이스와 추상클래스를 결합한 패턴이며, 인터페이스만 사용시 중복 코드가 계속 생기지만, 이러한 중복 코드를 추상클래스로 뺀 것이다.


즉, 미리 추상클래스에서 선언해놓고, 실제로 상속받아서 구현하는 것의 경우에는 원하는 것만 override하면 된다.


예시

// 1. 인터페이스 (규약)
public interface MyInterface {
    void method1();
    void method2();
    void method3();
    void method4();
}

// 2. 추상 골격 클래스 (공통 구현)
public abstract class AbstractMyInterface implements MyInterface {
    // 공통 구현 제공
    @Override
    public void method1() {
        // 기본 구현
    }
    
    @Override
    public void method2() {
        // 기본 구현
    }
    
    // method3, method4는 추상 메서드로 남겨둠
    // (구현 클래스가 반드시 구현해야 함)
}

// 3. 구체 클래스 (필요한 것만 구현)
public class ImplA extends AbstractMyInterface {
    @Override
    public void method3() {
        // A만의 구현
    }
    
    @Override
    public void method4() {
        // A만의 구현
    }
    // method1, method2는 상속받아서 사용!
}


5. 다시 예시 확인하기 - DiscardServer

import io.netty.buffer.ByteBuf;

import io.netty.channel.ChannelHandlerContext;
import io.netty.channel.ChannelInboundHandlerAdapter;

/**
 * Handles a server-side channel.
 */
public class DiscardServerHandler extends ChannelInboundHandlerAdapter { // (1)

    @Override
    public void channelRead(ChannelHandlerContext ctx, Object msg) { // (2)
        // Discard the received data silently.
        ((ByteBuf) msg).release(); // (3)
    }

    @Override
    public void exceptionCaught(ChannelHandlerContext ctx, Throwable cause) { // (4)
        // Close the connection when an exception is raised.
        cause.printStackTrace();
        ctx.close();
    }
}


코드를 읽어보면, Channel 내부의 ChannelPipeline에 서 관리하는 DiscardServerHandler를 구현한 것이다.


release()하는 코드는 channel로 넘어오는 msg를 그대로 버린다. 


exceptionCaught 는 I/O 작업시 혹은 이벤트 처리시에 에러가 날 시 에러를 처리한다. 

주석에 적힌대로 에러가 발생하면 연결을 끊는다. 


일반적으로 데이터를 처리하려면 연결을 열고, 처리하고 닫는게 순리니까... 


ByteBuf는 기존에 Java 에서 제공하는 ByteBuffer을 좀 더 쉽게 사용할 수 있도록 Netty에서 제공하는 class이다.


우리는 Handler, 즉 channl내로 들어오는 응답을 처리하는 handler를 만든 것이다. 


그러면 이것을 실제로 쓸 수 있도록 해야 하지 않나?


server를 만들어서 Handler를 배정해야한다.


DiscardServer.java

import io.netty.bootstrap.ServerBootstrap;

import io.netty.channel.ChannelFuture;
import io.netty.channel.ChannelInitializer;
import io.netty.channel.ChannelOption;
import io.netty.channel.EventLoopGroup;
import io.netty.channel.nio.NioEventLoopGroup;
import io.netty.channel.socket.SocketChannel;
import io.netty.channel.socket.nio.NioServerSocketChannel;
    
/**
 * Discards any incoming data.
 */
public class DiscardServer {
    
    private int port;
    
    public DiscardServer(int port) {
        this.port = port;
    }
    
    public void run() throws Exception {
        EventLoopGroup bossGroup = new NioEventLoopGroup(); // (1)
        EventLoopGroup workerGroup = new NioEventLoopGroup();
        try {
            ServerBootstrap b = new ServerBootstrap(); // (2)
            b.group(bossGroup, workerGroup)
             .channel(NioServerSocketChannel.class) // (3)
             .childHandler(new ChannelInitializer<SocketChannel>() { // (4)
                 @Override
                 public void initChannel(SocketChannel ch) throws Exception {
                     ch.pipeline().addLast(new DiscardServerHandler());
                 }
             })
             .option(ChannelOption.SO_BACKLOG, 128)          // (5)
             .childOption(ChannelOption.SO_KEEPALIVE, true); // (6)
    
            // Bind and start to accept incoming connections.
            ChannelFuture f = b.bind(port).sync(); // (7)
    
            // Wait until the server socket is closed.
            // In this example, this does not happen, but you can do that to gracefully
            // shut down your server.
            f.channel().closeFuture().sync();
        } finally {
            workerGroup.shutdownGracefully();
            bossGroup.shutdownGracefully();
        }
    }
    
    public static void main(String[] args) throws Exception {
        int port = 8080;
        if (args.length > 0) {
            port = Integer.parseInt(args[0]);
        }

        new DiscardServer(port).run();
    }
}


  • NioEventLoopGroup: I/O 작업을 처리하는 멀티스레드 이벤트 루프로, boss(연결 수락)와 worker(트래픽 처리) 두 개를 사용함
  • ServerBootstrap: 서버 설정을 쉽게 해주는 헬퍼 클래스
  • NioServerSocketChannel: 들어오는 연결을 수락하기 위한 서버 채널 클래스
  • ChannelInitializer: 새로 수락된 Channel의 파이프라인에 핸들러를 추가하여 구성하는 특수 핸들러
  • Channel 옵션: TCP 소켓 옵션(tcpNoDelay, keepAlive 등)을 설정할 수 있음
  • option() vs childOption(): option()은 ServerSocketChannel용, childOption()은 클라이언트 SocketChannel용 설정
  • 서버 시작: bind() 메서드로 포트에 바인딩하여 서버를 시작하며, 여러 번 호출해서 여러 포트에 바인딩 가능


이제 그럼 테스트를 해봐야지?


아 이러면... 넘어오는지 아닌지 확인해야하니 코드를 잠시 변경해보겠다.


import io.netty.channel.ChannelHandlerContext;
import io.netty.channel.ChannelInboundHandlerAdapter;

/**
 * Handles a server-side channel.
 */
public class DiscardServerHandler extends ChannelInboundHandlerAdapter { // (1)

    @Override
    public void channelRead(ChannelHandlerContext ctx, Object msg) { // (2)
        // Discard the received data silently.
        ByteBuf msg1 = (ByteBuf) msg;
        String string = msg1.toString();
        System.out.println("string = " + string);
        msg1.release(); // (3)
    }

    @Override
    public void exceptionCaught(ChannelHandlerContext ctx, Throwable cause) { // (4)
        // Close the connection when an exception is raised.
        cause.printStackTrace();
        ctx.close();
    }
}


그리고 요청을 보내면 다음과 같이 나올것이다.
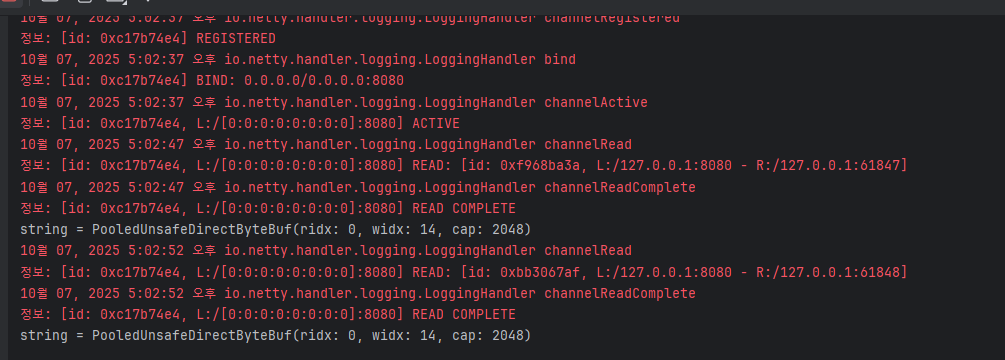


이렇게 여러개 알음알음 찾아보니... 결국 사용시에는 Channel 내부에 Handler를 잘 사용할 줄 알면 될 것 같다는 느낌도 들엇다.


그리고 처음에 코드를 보니 아 뭐야 예제 다 있네 껌이네! 하고 찾아보니 글이 엄청 길어졌다.


이렇게 생각하면 어떨까, 저렇게 생각하면 어떨까 하는 생각이 들어서 여러개 찾아보고 알아보다보니 나름 시간이 오래 걸렷다.


사실 불과 1년 전만해도 아무 강의나 막 보고 그랫었는데,


이러한 이해를 바탕으로 뭔가 하지 않으면 정말 금방 까먹는다는것을 깨닫고 (몇년이 걸린거냐 에휴 바보 ㅠㅠ)


현재 이렇게 찾다보니 정말 많은 것을 배울 수 있었다.


앞으로도 공식문서를 보고, AI와 함께 찾아보면서 학습하려고 한다.


또한, 공부를 진행하면서 부족한 부분이나 그러한 부분은 여태 좀 부족할 수 있으나 생각이 나면 다시 덫붙여서 사용하려고 한다. 


아, 그리고 Effective Java도 2년전에 보려다가 에잇 하고 왜 필요한가 하고 치웠는데... 다시 이 책을 꺼낼때가 된 것 같다.


역시 고기도 먹어본 놈이 먹는다고 좀 뭘 알아야 아는것 같다. 


참고

https://docs.spring.io/spring-framework/reference/web/webflux.html

https://docs.spring.io/spring-framework/reference/web/webflux/new-framework.html

https://netty.io/wiki/user-guide-for-4.x.html

https://netty.io/4.0/api/io/netty/channel/ChannelHandler.html

https://medium.com/@akhaku/netty-data-model-threading-and-gotchas-cab820e4815a