지난 시간에는 스프링 이벤트 처리를 어떻게 간편하게 할 수 있는지, Spring 에서 지원해주는 기능들을 적용해보았다.
이번 시간에는 스프링에서 지원해주는 이벤트 기능들에 대해 알아볼 것이다.
참고한 사이트는 다음과 같다.
출처:
https://www.youtube.com/watch?v=TwJ2Zbk28QM&ab_channel=SeleniumExpress
https://www.tutorialspoint.com/spring/event_handling_in_spring.htm
https://www.baeldung.com/spring-context-events
1. 예시 구성하기 (Example Setting)
지난 시간의 예시보다 좀 더 다양한 기능들을 알아보기 위해서 연습용 프로젝트를 구성하도록 하겠다.
프로젝트 패키지는 다음과 같다.

상황은 필자 키메라가 NaverPay를 이용해서 결제를 하는 중이다.
성공을 할 때도 있지만, 실패할 경우도 분명 있을 것이다.
성공을 할 때는 문제가 없지만, 실패할 경우에는 email과 문자를 사용자에게 보내줘야 한다고 가정하자.
그것을 이벤트로 우리는 관리하는 것이다.
config/AppConfig.java
package springevent.springevent2.config;

import org.springframework.context.annotation.ComponentScan;
import org.springframework.context.annotation.Configuration;

@Configuration
@ComponentScan("springevent.springevent2")
public class AppConfig {
}
event/PayFailureEvent.java
package springevent.springevent2.event;

import lombok.Getter;
import lombok.Setter;

@Getter
@Setter
public class PayFailureEvent {
    private String name;
    private double amount;
    public PayFailureEvent(String name, double amount) {
        this.name = name;
        this.amount = amount;
    }
}
listener/SendEmailListener.java
package springevent.springevent2.listener;

import org.springframework.context.event.EventListener;
import org.springframework.core.annotation.Order;
import org.springframework.stereotype.Component;
import springevent.springevent2.event.PayFailureEvent;

@Component
public class SendEmailListener {
    @Order(1)
    @EventListener
    public void start(PayFailureEvent event){
        System.out.println("Sending email to customer...");
        System.out.println("Hello, "+ event.getName() + " . Payment Failed for the amount " + event.getAmount());
    }
}
event listener를 등록 시에, 순서를 우리가 정할 수 있는데, 그것은 간단하게 @Order annotation으로 가능하다.
뒤에 출력 결과를 확인하면 필자 키메라가 등록한 순서대로 EventListener가 작동하는것을 확인할 수 있다.
listener/SendSmsListener.java
package springevent.springevent2.listener;

import org.springframework.context.event.EventListener;
import org.springframework.core.annotation.Order;
import org.springframework.stereotype.Component;
import springevent.springevent2.event.PayFailureEvent;

@Component
public class SendSmsListener {
    @Order(2)
    @EventListener
    public void start(PayFailureEvent event){
        System.out.println("Sending sms to customer...");
        System.out.println("Hello, " + event.getName() + " . Payment Failed for the amount " + event.getAmount());
    }

}
listener/MultiListener.java
package springevent.springevent2.listener;

import org.springframework.context.event.EventListener;
import org.springframework.core.annotation.Order;
import org.springframework.stereotype.Component;
import springevent.springevent2.event.PayFailureEvent;

@Component
public class MultiListener {
    @Order(3)
    @EventListener
    public void start1(PayFailureEvent event){
        System.out.println("start1 :: Multi Listener testing...");
    }

    @Order(4)
    @EventListener
    public void start2(PayFailureEvent event){
        System.out.println("start2 :: Multi Listener testing...");
    }
}
publisher/NaverPay.java
package springevent.springevent2.publisher;

import lombok.RequiredArgsConstructor;
import org.springframework.beans.factory.annotation.Autowired;
import org.springframework.context.ApplicationEventPublisher;
import org.springframework.stereotype.Component;
import springevent.springevent2.event.PayFailureEvent;

@Component
public class NaverPay {

    @Autowired
    private ApplicationEventPublisher eventPublisher;

    public void payTheBill(String name, double amount, boolean condition) {
        try {
            if(condition){
                throw new RuntimeException("Payment Failed!");
            }
            System.out.println("Hello, Customer : " + name);
            System.out.println("you succeed to pay the bill!");
        } catch (Exception e){
            e.printStackTrace();
            eventPublisher.publishEvent( new PayFailureEvent(name, amount);
        }
    }


}
main/App.java
package springevent.springevent2.main;

import org.springframework.context.annotation.AnnotationConfigApplicationContext;
import springevent.springevent2.config.AppConfig;
import springevent.springevent2.publisher.NaverPay;

public class App {
    public static void main(String[] args) {
        AnnotationConfigApplicationContext context = new AnnotationConfigApplicationContext(AppConfig.class);
        context.start();
        NaverPay pay = context.getBean("naverPay", NaverPay.class);
        pay.payTheBill("키메라", 200.00, true);
    }
}
코드를 실행하면 다음과 같은 결과를 얻는다. (좀 다를수도 있지만 잘 실행해보세요 ㅠㅠ 순서만 좀 바꿔서...)

이것에 여러개의 event 기능을 추가해보도록 하겠다!
2. Spring Application Context Events : built-in events
Event 기능을 지원하는 Event는 여러개가 있는데, lifecycle에 따라서 실행되는 순서가 다른 이벤트들이 있다.
| No | Spring Application Context Events : built-in events |
| 1 | ContextRefreshedEvent ApplicationContext를 초기화하거나(initializing) 새롭게하던지(refresh) 둘 다, Spring 은 ContextRefreshedEvent를 등록한다.(raise - 이건 도대체 어떻게 해석해야 여기에 맞는지 모르겟네... ㅠㅠ 올리다 말고... ) 전형적으로 refresh는 context가 닫히지 않는 한 여러번 불러올 수 있다. |
| 2 | ContextStartedEvent ApplicationContext가 ConfigurableApplicationContext 인터페이스에서 start() 메소드를 사용하기 시작할 때 publish한다. 당신의 database를 poll할 수 있거나 이 이벤트를 받을 후에 어떤 멈춘 application을 재시작 할 수 있다. ConfiguratbleApplicationContext에서 start() 메소드를 부름으로서, 우리는 이 이벤트를 부르고 ApplicationContext를 시작한다. 실제로, 메소드는 전형적으로 명확한 멈춤(stop)후에 bean을 다시 재시작하기위해 사용된다. 우리는 또한 자동 시작을 위해 components들이 configuration없이 다루기 위해 메소드를 사용한다. 혹은, database를 poll할 수 있거나 이 이벤트를 받을 후에 어떤 멈춘 application을 재시작 할 수 있다. * 폴링이란? : 일정한 주기(특정한 시간)를 가지고 서버와 응답을 주고받는 방식이 폴링 방식이다. |
| 3 | ContextStoppedEvent ApplicatonContext가 멈출 때, ConfigurableApplicationContext에서 stop() 메소드를 호출해서 publish한다. 우리는 start() 메소드를 사용해서 멈춘 이벤트를 재시작할 수 있다. |
| 4 | ContextClosedEvent ApplicationContext가 닫힐 때 ConfigurableApplicationContext에서 close() 메소드를 사용함으로써 publish한다. 현실에서, context를 닫은 후 , ApplicationContext를 재시작할 수 없다. Context는AppplicationContext의 삶의 끝까지 도달하고 그래서 우리는 ContextStoppedEvent에서 처럼 재시작할 수 없다. |
| 5 | RequestHandledEvent HTTP 요청이 제공되는 모든 빈(Bean)들에게 웹 특화된 이벤트를 알려준다. |
필자 키메라가 생각을 해보니 @EventListener의 역할이 뭔지 정확히 말을 안햇는데...
사용을 해보니 대강 알것같다. 기존에 직접 상속해서 override를 해줘야 하는 것들을 알아서 해주는거 같은데...
찾아보니 method level에서 ApplicationListener를 자동적으로 등록해서 Event로 등록해주는 annotation이다.
그러면... 실제로 위의 기능들이 어느 때에 실행되고, 어떻게 하면 사용할 수 있는지 간단하게 알아보도록 하겠다.
3. Spring Application Context Events : built-in events Practice!
listener/BuiltInEventListener
package springevent.springevent2.listener;

import org.springframework.context.event.*;
import org.springframework.stereotype.Component;

@Component
public class BuiltInEventListener {
    @EventListener
    public void onApplicationEvent(ContextRefreshedEvent event) {
        System.out.println("application initialized or refreshed\n");
        System.out.println(event);
    }

    @EventListener
    public void handleContextStartedEvent(ContextStartedEvent event) {
        System.out.println("application initialized with start()\n");
        System.out.println(event);
    }

    @EventListener
    public void handleContextStopEvent(ContextStoppedEvent event) {
        System.out.println("application stopped using stop()\n");
        System.out.println(event);
    }

    @EventListener
    public void handleContextCloseEvent(ContextClosedEvent event) {
        System.out.println("application stopped using close()\n");
        System.out.println(event);
    }
}
별거없다. @EventListener로 등록해주면 event 의 cycle에 따라서 우리가 언제 실행하고 싶은지 정하면 된다.
close 한 경우에는 다시 restart가 불가능 하다니까 유의하자!
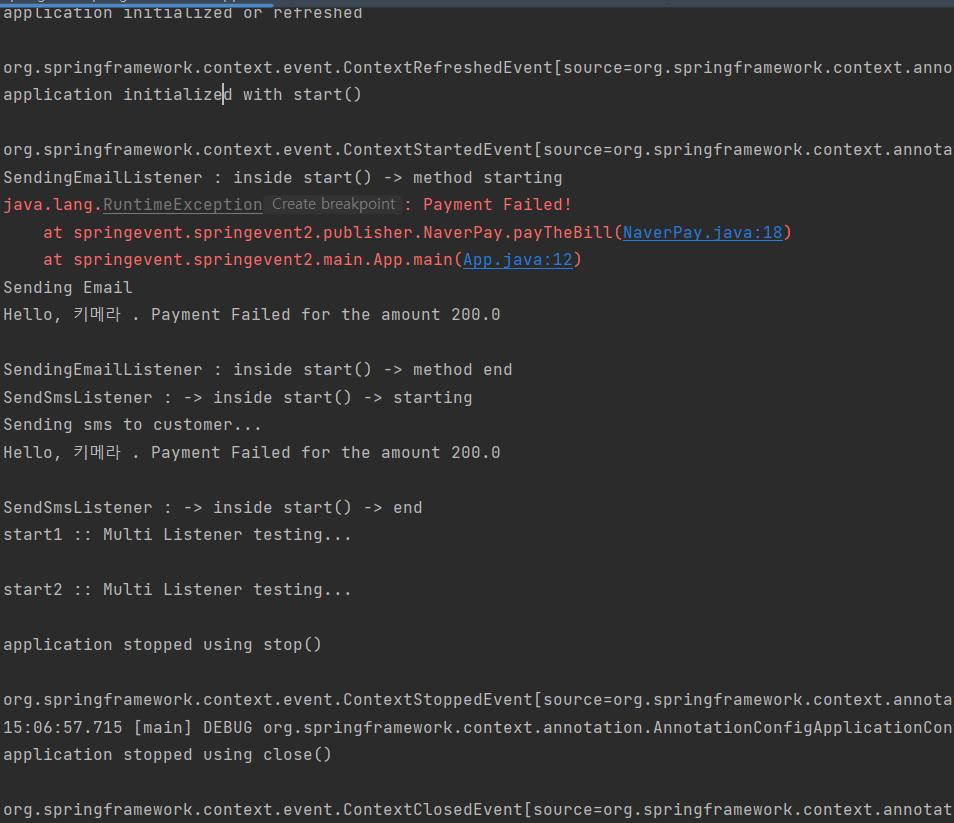
실행 결과는 다음과 같다.

편하게 볼라고 필자가 띄어쓰기를 한 것은 있지만 뭐... 크게 다르지 않다.
4. 이벤트 비동기 처리 (Event Async Processing)
이벤트에서도 비동기 처리가 필요한 경우가 있다.
우리가 여지껏 위에서 사용했던 방식이 동기 방식이다.
만약 동기 방식으로만 이벤트를 다룰 수 있게 된다면 생기는 문제점이 있다.
이벤트에서 우리가 하고자 하는 일들이 끝날 때 까지 다른일을 하지 못하는 것이다!
위의 예시에서 필자 키메라는 NaverPay 예제를 통해서 실행시켰는데 이메일을 내고, 문자를 보내는 일이 오래 걸린다면 어떻게 될까?
우리가 여태 한 동기식 이벤트 처리는 두개의 작업이 끝날 때까지 아무것도 하질 못한다.
프로그램이 멈춰버리는 것이다!
이러한 문제점을 해결하기 위해 또 우리 Spring(아니 스프링 진짜 대단하긴 하네...)에서 이미 기능을 제공하고 있다.
5. 이벤트 비동기 처리 적용하기
Appfig.java - 수정
package springevent.springevent2.config;

import org.springframework.context.annotation.Bean;
import org.springframework.context.annotation.ComponentScan;
import org.springframework.context.annotation.Configuration;
import org.springframework.context.event.ApplicationEventMulticaster;
import org.springframework.context.event.SimpleApplicationEventMulticaster;
import org.springframework.core.task.SimpleAsyncTaskExecutor;

@Configuration
@ComponentScan("springevent.springevent2")
public class AppConfig {
    @Bean("applicationEventMulticaster")
    public ApplicationEventMulticaster makingItAsync() {
        SimpleApplicationEventMulticaster applicationEventMulticaster = new SimpleApplicationEventMulticaster();
        applicationEventMulticaster.setTaskExecutor(new SimpleAsyncTaskExecutor());
        return applicationEventMulticaster;
    }
}
SendEmailListener.java - 수정
package springevent.springevent2.listener;

import org.springframework.context.event.EventListener;
import org.springframework.core.annotation.Order;
import org.springframework.stereotype.Component;
import springevent.springevent2.event.PayFailureEvent;

@Component
public class SendEmailListener {
    @Order(1)
    @EventListener
    public void start(PayFailureEvent event){
        System.out.println("SendingEmailListener : inside start() -> method starting");
        try {
            Thread.sleep(4000);
            System.out.println("Sending Email");
            System.out.println("Hello, "+ event.getName() + " . Payment Failed for the amount " + event.getAmount()+"\n");
        } catch(InterruptedException e){
            e.printStackTrace();
        }
        System.out.println("SendingEmailListener : inside start() -> method end");
    }
}
SendSmsListener.java - 수정
package springevent.springevent2.listener;

import org.springframework.context.event.EventListener;
import org.springframework.core.annotation.Order;
import org.springframework.stereotype.Component;
import springevent.springevent2.event.PayFailureEvent;

@Component
public class SendSmsListener {
    @Order(2)
    @EventListener
    public void start(PayFailureEvent event){
        System.out.println("SendSmsListener : -> inside start() -> starting");

        try {
            Thread.sleep(3000);
            System.out.println("Sending sms to customer...");
            System.out.println("Hello, " + event.getName() + " . Payment Failed for the amount " + event.getAmount()+"\n");
        } catch (InterruptedException e) {
            throw new RuntimeException(e);
        }
        System.out.println("SendSmsListener : -> inside start() -> end");

    }

}
실행 결과는 다음과 같다.
필자가 한 방식 말고도
@EnableSync와 @Async annoatation을 이용해서 충분히 구현이 가능하다.
이번 시간에는 지난 기본 Spring Event 사용법에 이어서 약간 더 첨가된 사용법들에 대해서 알아보았다.
'Spring > 스프링 기본' 카테고리의 다른 글
| [Spring Framework] SOAP 와 REST(3부작) : 1탄 - SOAP가 뭐야? (2) | 2025.05.15 |
|---|---|
| [Spring] 스프링 이벤트 처리(Spring Event Processing) - 2탄 : 기본 사용법 (0) | 2022.07.29 |
| [Spring] 스프링 이벤트 처리(Spring Event Processing) - 1탄 : 개요 (0) | 2022.07.28 |
| [Spring] Spring Container, BeanFactory, ApplicationContext 알+ 관련 Annotation 알아보기 (0) | 2022.07.26 |
| [Spring] 기본지식 - 서블릿(servlet) 과 서블릿 컨테이너(Servlet Container) (4) | 2022.07.24 |